| Home | All Classes | Main Classes | Annotated | Grouped Classes | Functions |
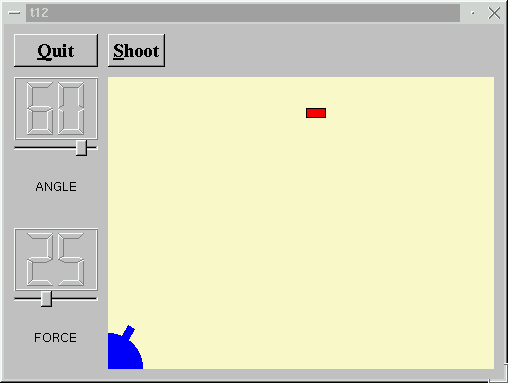
In this example, we extend our LCDRange class to include a text label. We also provide something to shoot at.
The LCDRange now has a text label.
class TQLabel;
We name declare TQLabel because we want to use a pointer to it in the class definition.
    class LCDRange : public TQVBox
    {
        TQ_OBJECT
    public:
        LCDRange( TQWidget *parent=0, const char *name=0 );
        LCDRange( const char *s, TQWidget *parent=0,
                  const char *name=0 );
We have added a new constructor that sets the label text in addition to the parent and name.
const char *text() const;
This function returns the label text.
void setText( const char * );
This slot sets the label text.
    private:
        void init();
Because we now have two constructors, we have chosen to put the common initialization in the private init() function.
TQLabel *label;
We also have a new private variable: a TQLabel. TQLabel is one of TQt's standard widgets and can show a text or a pixmap with or without a frame.
#include <ntqlabel.h>
Here we include the TQLabel class definition.
    LCDRange::LCDRange( TQWidget *parent, const char *name )
            : TQVBox( parent, name )
    {
        init();
    }
This constructor calls the init() function, which contains the common initialization code.
    LCDRange::LCDRange( const char *s, TQWidget *parent,
                        const char *name )
            : TQVBox( parent, name )
    {
        init();
        setText( s );
    }
This constructor first calls init() and then sets the label text.
    void LCDRange::init()
    {
        TQLCDNumber *lcd  = new TQLCDNumber( 2, this, "lcd"  );
        slider = new TQSlider( Horizontal, this, "slider" );
        slider->setRange( 0, 99 );
        slider->setValue( 0 );

        label = new TQLabel( " ", this, "label"  );
        label->setAlignment( AlignCenter );

        connect( slider, SIGNAL(valueChanged(int)),
                 lcd, SLOT(display(int)) );
        connect( slider, SIGNAL(valueChanged(int)),
                 SIGNAL(valueChanged(int)) );

        setFocusProxy( slider );
    }
The setup of lcd and slider is the same as in the previous chapter. Next we create a TQLabel and tell it to align the contents centered (both vertically and horizontally). The connect() statements have also been taken from the previous chapter.
    const char *LCDRange::text() const
    {
        return label->text();
    }
This function returns the label text.
    void LCDRange::setText( const char *s )
    {
        label->setText( s );
    }
This function sets the label text.
The CannonField now has two new signals: hit() and missed(). In addition it contains a target.
void newTarget();
This slot creates a target at a new position.
    signals:
        void  hit();
        void  missed();
The hit() signal is emitted when a shot hits the target. The missed() signal is emitted when the shot moves beyond the right or bottom edge of the widget (i.e., it is certain that it has not and will not hit the target).
void paintTarget( TQPainter * );
This private function paints the target.
TQRect targetRect() const;
This private function returns the enclosing rectangle of the target.
TQPoint target;
This private variable contains the center point of the target.
#include <ntqdatetime.h>
We include the TQDate, TQTime, and TQDateTime class definitions.
#include <stdlib.h>
We include the stdlib library because we need the rand() function.
newTarget();
This line has been added to the constructor. It creates a "random" position for the target. In fact, the newTarget() function will try to paint the target. Because we are in a constructor, the CannonField widget is invisible. TQt guarantees that no harm is done when calling repaint() on a hidden widget.
    void  CannonField::newTarget()
    {
        static bool first_time = TRUE;
        if ( first_time ) {
            first_time = FALSE;
            TQTime midnight( 0, 0, 0 );
            srand( midnight.secsTo(TQTime::currentTime()) );
        }
        TQRegion r( targetRect() );
        target = TQPoint( 200 + rand() % 190,
                         10  + rand() % 255 );
        repaint( r.unite( targetRect() ) );
    }
This private function creates a target center point at a new "random" position.
We use the rand() function to fetch random integers. The rand() function normally returns the same series of numbers each time you run a program. This would make the target appear at the same position every time. To avoid this, we must set a random seed the first time this function is called. The random seed must also be random in order to avoid equal random number series. The solution is to use the number of seconds that have passed since midnight as a pseudo-random value.
First we create a static bool local variable. A static variable like this one is guaranteed to keep its value between calls to the function.
The if test will succeed only the first time this function is called because we set first_time to FALSE inside the if block.
Then we create the TQTime object midnight, which represents the time 00:00:00. Next we fetch the number of seconds from midnight until now and use it as a random seed. See the documentation for TQDate, TQTime, and TQDateTime for more information.
Finally we calculate the target's center point. We keep it within the rectangle (x=200, y=35, width=190, height=255), (i.e., the possible x and y values are x = 200..389 and y = 35..289) in a coordinate system where we put y position 0 at the bottom edge of the widget and let y values increase upwards X is as normal, with 0 at the left edge and with x values increasing to the right.
By experimentation we have found this to always be in reach of the shot.
Note that rand() returns a random integer >= 0.
    void CannonField::moveShot()
    {
        TQRegion r( shotRect() );
        timerCount++;

        TQRect shotR = shotRect();
This part of the timer event has not changed from the previous chapter.
        if ( shotR.intersects( targetRect() ) ) {
            autoShootTimer->stop();
            emit hit();
This if statement checks whether the shot rectangle intersects the target rectangle. If it does, the shot has hit the target (ouch!). We stop the shoot timer and emit the hit() signal to tell the outside world that a target was destroyed, and return.
Note that we could have created a new target on the spot, but because the CannonField is a component we leave such decisions to the user of the component.
        } else if ( shotR.x() > width() || shotR.y() > height() ) {
            autoShootTimer->stop();
            emit missed();
This if statement is the same as in the previous chapter, except that it now emits the missed() signal to tell the outside world about the failure.
} else {
And the rest of the function is as before.
CannonField::paintEvent() is as before, except that this has been added:
        if ( updateR.intersects( targetRect() ) )
            paintTarget( &p );
These two lines make sure that the target is also painted when necessary.
    void CannonField::paintTarget( TQPainter *p )
    {
        p->setBrush( red );
        p->setPen( black );
        p->drawRect( targetRect() );
    }
This private function paints the target; a rectangle filled with red and with a black outline.
    TQRect CannonField::targetRect() const
    {
        TQRect r( 0, 0, 20, 10 );
        r.moveCenter( TQPoint(target.x(),height() - 1 - target.y()) );
        return r;
    }
This private function returns the enclosing rectangle of the target. Remember from newTarget() that the target point uses y coordinate 0 at the bottom of the widget. We calculate the point in widget coordinates before we call TQRect::moveCenter().
The reason we have chosen this coordinate mapping is to fix the distance between the target and the bottom of the widget. Remember that the widget can be resized by the user or the program at any time.
There are no new members in the MyWidget class, but we have slightly changed the constructor to set the new LCDRange text labels.
LCDRange *angle = new LCDRange( "ANGLE", this, "angle" );
We set the angle text label to "ANGLE".
LCDRange *force = new LCDRange( "FORCE", this, "force" );
We set the force text label to "FORCE".
The LCDRange widgets look a bit strange - the built-in layout management in TQVBox gives the labels too much space and the rest not enough. We'll fix that in the next chapter.
(See Compiling for how to create a makefile and build the application.)
Make a cheat button that, when pressed, makes the CannonField display the shot trajectory for five seconds.
If you did the "round shot" exercise from the previous chapter, try changing the shotRect() to a shotRegion() that returns a TQRegion so you can have really accurate collision detection.
Make a moving target.
Make sure that the target is always created entirely on-screen.
Make sure that the widget cannot be resized so that the target isn't visible. Hint: TQWidget::setMinimumSize() is your friend.
Not easy; make it possible to have several shots in the air at the same time. Hint: make a Shot object.
You're now ready for Chapter 13.
[Previous tutorial] [Next tutorial] [Main tutorial page]
| Copyright © 2007 Trolltech | Trademarks | TQt 3.3.8
|