| Home | All Classes | Main Classes | Annotated | Grouped Classes | Functions |
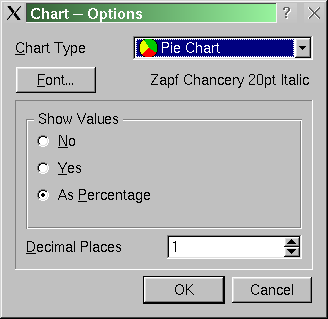
We provide an options dialog so that the user can set options that apply to all data sets in one place.
(Extracts from optionsform.h.)
    class OptionsForm : public TQDialog
    {
        TQ_OBJECT
    public:
        OptionsForm( TQWidget* parent = 0, const char* name = "options form",
                     bool modal = false, WFlags f = 0 );
        ~OptionsForm() {}

        TQFont font() const { return m_font; }
        void setFont( TQFont font );

        TQLabel *chartTypeTextLabel;
        TQComboBox *chartTypeComboBox;
        TQPushButton *fontPushButton;
        TQLabel *fontTextLabel;
        TQFrame *addValuesFrame;
        TQButtonGroup *addValuesButtonGroup;
        TQRadioButton *noRadioButton;
        TQRadioButton *yesRadioButton;
        TQRadioButton *asPercentageRadioButton;
        TQLabel *decimalPlacesTextLabel;
        TQSpinBox *decimalPlacesSpinBox;
        TQPushButton *okPushButton;
        TQPushButton *cancelPushButton;

    protected slots:
        void chooseFont();

    protected:
        TQVBoxLayout *optionsFormLayout;
        TQHBoxLayout *chartTypeLayout;
        TQHBoxLayout *fontLayout;
        TQVBoxLayout *addValuesFrameLayout;
        TQVBoxLayout *addValuesButtonGroupLayout;
        TQHBoxLayout *decimalPlacesLayout;
        TQHBoxLayout *buttonsLayout;

    private:
        TQFont m_font;
    };
The layout of this dialog is slightly more complicated than for the set data form, but we only need a single slot. Unlike the "smart" set data form this is a "dumb" dialog that simply provides the widgets for the caller to set and read. The caller is responsible for updating things based on the changes the user makes.
(Extracts from optionsform.cpp.)
    #include "images/options_horizontalbarchart.xpm"
    #include "images/options_piechart.xpm"
    #include "images/options_verticalbarchart.xpm"
We include some some pixmaps to use in the chart type combobox.
    OptionsForm::OptionsForm( TQWidget* parent, const char* name,
                              bool modal, WFlags f )
        : TQDialog( parent, name, modal, f )
    {
        setCaption( "Chart -- Options" );
        resize( 320, 290 );
We pass all the arguments on to the TQDialog constructor, set a caption and set an initial size.
The layout of the form will be to have the chart type label and combo box in a horizontal box layout, and similarly for the font button and font label, and for the decimal places label and spinbox. The buttons will also be placed in a horizontal layout, but with a spacer to move them to the right. The show values radio buttons will be vertically aligned within a frame. All of these will be laid out in a vertical box layout.
optionsFormLayout = new TQVBoxLayout( this, 11, 6 );
All the widgets will be laid out within the form's vertical box layout.
chartTypeLayout = new TQHBoxLayout( 0, 0, 6 );
The chart type label and combobox will be laid out side by side.
        chartTypeTextLabel = new TQLabel( "&Chart Type", this );
        chartTypeLayout->addWidget( chartTypeTextLabel );

        chartTypeComboBox = new TQComboBox( false, this );
        chartTypeComboBox->insertItem( TQPixmap( options_piechart ), "Pie Chart" );
        chartTypeComboBox->insertItem( TQPixmap( options_verticalbarchart ),
                                       "Vertical Bar Chart" );
        chartTypeComboBox->insertItem( TQPixmap( options_horizontalbarchart ),
                                       "Horizontal Bar Chart" );
        chartTypeLayout->addWidget( chartTypeComboBox );
        optionsFormLayout->addLayout( chartTypeLayout );
We create the chart type label (with an accelerator which we'll relate to the chart type combobox later). We also create a chart type combobox, populating it with both pixmaps and text. We add them both to the horizontal layout and add the horizontal layout to the form's vertical layout.
        fontLayout = new TQHBoxLayout( 0, 0, 6 );

        fontPushButton = new TQPushButton( "&Font...", this );
        fontLayout->addWidget( fontPushButton );
        TQSpacerItem* spacer = new TQSpacerItem( 0, 0,
                                               TQSizePolicy::Expanding,
                                               TQSizePolicy::Minimum );
        fontLayout->addItem( spacer );

        fontTextLabel = new TQLabel( this ); // Must be set by caller via setFont()
        fontLayout->addWidget( fontTextLabel );
        optionsFormLayout->addLayout( fontLayout );
We create a horizontal box layout to hold the font button and font label. The font button is straight-forward. We add a spacer to improve the appearance. The font text label is initially empty (since we don't know what font the user is using).
        addValuesFrame = new TQFrame( this );
        addValuesFrame->setFrameShape( TQFrame::StyledPanel );
        addValuesFrame->setFrameShadow( TQFrame::Sunken );
        addValuesFrameLayout = new TQVBoxLayout( addValuesFrame, 11, 6 );

        addValuesButtonGroup = new TQButtonGroup( "Show Values", addValuesFrame );
        addValuesButtonGroup->setColumnLayout(0, TQt::Vertical );
        addValuesButtonGroup->layout()->setSpacing( 6 );
        addValuesButtonGroup->layout()->setMargin( 11 );
        addValuesButtonGroupLayout = new TQVBoxLayout(
                                            addValuesButtonGroup->layout() );
        addValuesButtonGroupLayout->setAlignment( TQt::AlignTop );

        noRadioButton = new TQRadioButton( "&No", addValuesButtonGroup );
        noRadioButton->setChecked( true );
        addValuesButtonGroupLayout->addWidget( noRadioButton );

        yesRadioButton = new TQRadioButton( "&Yes", addValuesButtonGroup );
        addValuesButtonGroupLayout->addWidget( yesRadioButton );

        asPercentageRadioButton = new TQRadioButton( "As &Percentage",
                                                    addValuesButtonGroup );
        addValuesButtonGroupLayout->addWidget( asPercentageRadioButton );
        addValuesFrameLayout->addWidget( addValuesButtonGroup );
The user may opt to display their own labels as they are or to add the values at the end of each label, either as-is or as percentages.
We create a frame to present the radio buttons in and create a layout for them. We create a button group (so that TQt will take care of handling the exclusive radio button behaviour automatically). Next we create the radio buttons, making "No" the default.
The decimal places label and spin box are laid out just like the other horizontal layouts, and the buttons are laid out in a very similar way to the buttons in the set data form.
        connect( fontPushButton, TQ_SIGNAL( clicked() ), this, TQ_SLOT( chooseFont() ) );
        connect( okPushButton, TQ_SIGNAL( clicked() ), this, TQ_SLOT( accept() ) );
        connect( cancelPushButton, TQ_SIGNAL( clicked() ), this, TQ_SLOT( reject() ) );
We only need three connections:
        chartTypeTextLabel->setBuddy( chartTypeComboBox );
        decimalPlacesTextLabel->setBuddy( decimalPlacesSpinBox );
We use the setBuddy() function to associate widgets with label accelerators.
    void OptionsForm::chooseFont()
    {
        bool ok;
        TQFont font = TQFontDialog::getFont( &ok, m_font, this );
        if ( ok )
            setFont( font );
    }
When the user clicks the Font button this slot is invoked. It simply calls the static TQFontDialog::getFont() function to obtain the user's choice of font. If they chose a font we call our setFont() slot which will present a textual description of the font in the font label.
    void OptionsForm::setFont( TQFont font )
    {
        TQString label = font.family() + " " +
                        TQString::number( font.pointSize() ) + "pt";
        if ( font.bold() )
            label += " Bold";
        if ( font.italic() )
            label += " Italic";
        fontTextLabel->setText( label );
        m_font = font;
    }
This function displays a textual description of the chosen font in the font label and holds a copy of the font in the m_font member. We need the font in a member so that we can provide a default font for chooseFont().
« Taking Data | Contents | The Project File »
| Copyright © 2007 Trolltech | Trademarks | TQt 3.3.8
|